
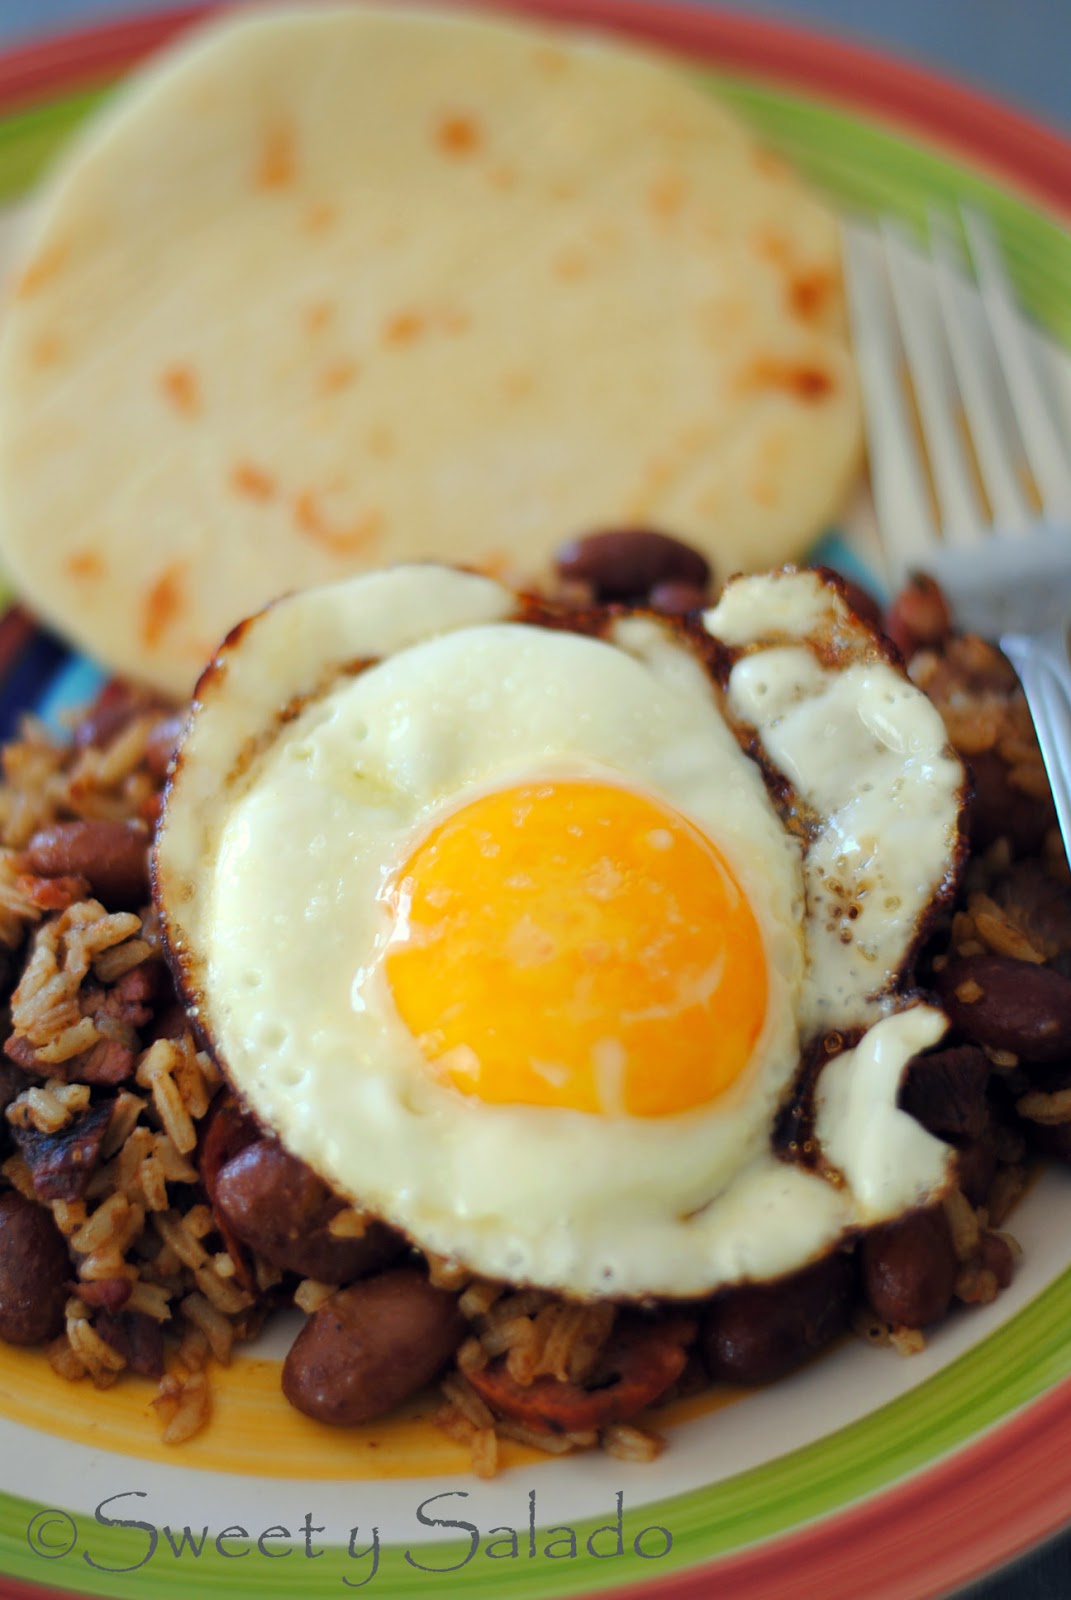
Colombian Arepa de Huevo (Egg Arepa)
If you follow my blog you should know by now how much Colombians love anything that is made with corn like buñuelos, natilla, empanadas and arepas. And by now you should also know that we love to fry our food… a lot. So, in today’s post I have a Colombian recipe that is not only made with corn but it is also fried, not once, but twice. I’m talking about the famous arepa de huevo or egg stuffed arepa. These arepas are extremely popular in the Colombian Caribbean coast and you will see all kinds of street vendors selling them like hot cakes, well, like hot arepas (bad joke).

I’m not going to lie to you but making these arepas is not easy because putting that egg inside without making a mess in your kitchen takes a lot of practice. The first time I made them I was not able to get that freaking egg inside and after the third arepa I decided to use a cup with a pointed lip to see if it would go in, and sure enough, it did!

After making these arepas you will understand why they’re so popular in Colombia, the combination of the seasoned fried dough with the fried egg is really, really good and I wouldn’t blame you if you end up eating more than one.
¡Buen Provecho!
Print
Arepa de Huevo (Egg Stuffed Arepa)
- Yield: 6 1x
Ingredients
- 1 cup (240 ml) hot water
- ½ tsp food coloring (Triguisar, Sazón Goya, Bijol, achiote)
- 1 tsp salt
- ½ tsp sugar
- 1 cup (150 g) white pre cooked corn meal
- 6 large eggs
- Oil for frying (canola, vegetable, peanut)
- Salt and pepper to taste
Instructions
- Pour the hot water in a large bowl and then add the food coloring, salt and sugar. Stir well.
- Slowly add the corn meal and stir it with a wooden spoon or spatula. When the corn meal has absorbed the water, knead it with your hands until the dough is smooth and without any lumps. Divide the dough into 6 equal balls.
- Place one ball inside a tortilla press covered with plastic and flatten it to about ¼ inch (.60 cm) thick. Make sure the arepa is evenly flat and gently press the edges with your fingers to get rid of any cracks. Repeat this process with the rest of the dough.
- Gently place the arepa in oil that has been pre-heated at 350ºF (180ºC) and let it sink to the bottom. Once the arepa rises to the surface start covering it with more oil with the help of a large spoon for about 2-3 minutes. This will make the arepa puff up. Then take it out of the oil and drain it on paper towels. Repeat this process with every arepa.
- In the meantime crack one egg into a cup that has a pointy lip and season with salt and pepper to taste.
- Once the arepa is cool enough to handle, make an incision with a sharp knife about 1½ inches (3.5 cm) wide on the side of the arepa to make a small pocket. Then carefully pour the seasoned egg inside and immediately place the arepa back in the hot oil and fry it for another 2-3 minutes or until the egg is cooked through. Repeat this process with every arepa.
- Remove the arepa from the hot oil and let it drain on paper towels. Serve immediately.
Notes
You can also shape the arepas with your hands or with the bottom of a small pot or plate.


I have been attempting to make these numerous times and it's always a failure. One side of the arepa is so much thinner than the other, and cracks open- and my egg falls on the floor through the hole in the arepa-any tips? I love the way these taste and I'm not giving up. Thanks so much
Not giving up is key. You would think that adding a raw egg to an arepa would be easier but it does take practice. Try to add oil to the arepa when you put it in because that will make it bubble up inside and it's those bubbles that will make it hollow inside. When opening the arepa with a knife, try not to puncture it at the bottom. Let it cool completely so it's easier to handle, that way you can take your time with it. Carefully insert the knife and try to keep it in the center so it doesn't make any extra holes. Then you can carefully add the egg and immediately place it in the oil. But like I said, it's just a matter of doing it over and over again.
Siguo to web todas tus recetas son perfectas.Gracias
No sabia que tenia que dejar que las arepas would come to room temperature to do the egg filling. Ok , thanks for the tip.
You're welcome! You don't really have to wait until it fully comes to room temperature but let it cool down enough so it's not too hot, otherwise, it will burn your hand.
hola oye lo necesito urgentes me puedes dar medidas para hacer solo 3 arepas tengo 12 años y em encanta cocinar pero no soy muy bien haciendo las medidas de cuanto devo hechar me urge porfa ayudame te quiero me encantan todas tu recetas 🙂
¡Hola! Las medidas para esta receta te rinden para hacer 6 arepas en total. Si solo necesitas hacer 3 arepas, solo tienes que dividir todos los ingredientes a la mitad. Asegúrate de usar tazas medidoras o una pesa de cocina para tener bien las medidas que serían: Media taza de agua o 120 mililitros, 1/4 de cucharadita de color, pero si usas harina de maíz precocida amarilla, no lo necesitas, media cucharadita de sal, 1/4 de cucharadita de azúcar, media taza de harina de maíz precocida o 75 gramos, 3 huevos y sal y pimienta al gusto.